Welcome! Here you’ll find a few examples of some of the projects we’ve been considering in this workshop.
The following are photographs of Banded Pattern Designs created by 6 and 7 year-olds following a classroom discussion about the experience of Patterns. In that initial discussion, we considered both patterns that are within us, and some larger patterns that are outside of us, noting that patterns help form the world within which we flourish. As such, patterns are important to understand and appreciate. As in the teachers’ workshop, student participants are deliberately asked to think and talk about patterns that can be seen, heard, and felt in nature (day and night, the seasons, tides, the apparent movements of the stars ) or in our bodies (which, of course, are also part of nature), heart beats, breathing, walking, digestion, blinking, etc. We also discuss the varied patterns that we humans create as integral parts of our many diverse cultures. After I provide a few examples, the children readily understand that patterns are also intrinsic to many human arts including music, decorative visual arts, dance, poetry, gardening, building, weaving, and architecture among others.
During the Oct. teachers’ workshop, I emphasized the significance of this initial conversation with the children. I mentioned that, ideally, it should help youngsters begin to comprehend (intellectually / verbally and intuitively) how completely we humans belong to and are embraced by patterns in both Nature and Culture. At the conclusion of the pattern discussion, I try to explain to the youngsters that when they discern or create patterns, they are essentially building upon their inherited aesthetic capacities, an aesthetic birthright which allows them to readily both appreciate and generate these often beautiful phenomena. Through their visual art studies of pattern, they’re enhancing and expanding their unique set of art-making gifts. With just a little practice, they will discover that they’re able to create their own visual designs which are often interesting, pleasant and expressive, and of potential use to themselves and others. We note that an awareness of Patterns is fundamental not only in the Arts but also in the Empirical Sciences (which are are special way of understanding nature. It’s not surprising that Pattern and Matter & Energy: flows, cycles [a kind of pattern], and conservation constitute two of the Seven Cross-Cutting Concepts that are foundational within the Next Generation Science Standards that shape science education in the United States.
In the October Teachers’ Workshop, participants tried for themselves some of the initial pattern building exercises that we employ with elementary students. Using watercolor markers and beeswax crayons, we all did some hands-on pattern making which was, hopefully, both illuminating and fun. At the same time, we learned a little about how our ancestors across the globe expressed intriguing insights concerning the way the world works through the codes expressed in these beautiful and symbolic pattern designs.
The actual exercises involved first ‘banding’ large, colored construction papers with thick stripes (formed by carefully dragging block-shaped, Stockmar beeswax crayons or peeled classroom wax crayons across the papers). Within the spaces created by these multi-hued, longitudinal bands, students tried to replicate (using a free-hand, dot matrix method for spacing) classic patterns such as Sun Disks, Suns & Stars / Days & Nights, Mountains / Chevrons, Cretan Waves, Meanders, Foliated Stems, Eggs & Darts, and Flowers & Seeds (Life Cycles). I provided a sample sheet with examples of Chinese Thunder Lines, Clouds, and Pearl patterns, among others. I also drew step by step a few examples on a paper flip chart in our conference room. It was at this time that I mentioned my preference for using colorful, soft chalks on a blackboard during this phase of the lesson. Nevertheless, in many settings where I’ve taught, I’ve had to rely on watercolor markers on large papers, environmentally-questionable whiteboard markers on whiteboards, and even Earth-costly, often unreliable, electronic ‘smartboards’ with projection attachments for drawing and sharing the samples.
After the introductory explanation and imitative pattern-making exercise, participants were invited to create their own original designs using the dot matrix method to set up the initial, rhythmic guideline . They were encouraged to continue whatever pattern they established across the entire page, an instruction / practice which fosters persistence and focused attention (executive function skills). As you can see in the samples from the first grade students, that goal is very difficult for some to accomplish.
Photos of works on paper follow. All of these were created by First Graders. (The teachers in the October Workshop skedaddled away with their creations before I remembered to photograph them!)


Throughout the first year and in the following years as well , I recommend that students have opportunities to explore many more pattern design projects based on traditional designs of varying complexity from different times and cultures. In this way, students will have opportunities to apply, develop, and expand their skills and insights within this important genre of visual arts expression.
So that you can see a specific example of this spiraling process and how it would work during a month long pattern unit for First Graders, I’ll summarize here a study we would make (after the initial pattern lesson) of an actual three-dimensional, hand-painted amphora from Mexico. To begin, the youngsters have an opportunity to admire and discuss the two-foot tall vase and to consider how it was made, by whom, with what materials, and for what function / purpose. They also learn some of the the traditional names for the parts of a pot. These present a charming analogy to the parts of the human body (from mouth, lips, neck, shoulders, belly, to foot) The children usually found this part of the lesson rather amusing, yet at the same time they were boosting their art history knowledge and vocabulary. They were also exercising their imaginative, analogous thinking capacities.
Next, we used this project to strengthen youngters conscious awareness of symmetry. As they stood next to their tables and put their two hands together, they were asked to notice how their left hand perfectly matched their right one. From this observation, we embarked on a definition and discussion of the concept/ idea of ‘symmetry,’ and the English word which derives from the Greek words for equal measure. (Here’s an example of how we would use the visual arts to promote math thinking and concepts (such as equivalence) in the artroom – a definite goal of STEAM). The children saw how they could check directly and test or even measure to see that their two hands were equal to one another – that they formed perfect reflections / mirror images of one another as well. They could notice, by deliberately using their powers of “observation,” that their classmates’ two eyes, ears, arms, and legs – as well as their own eyes, ears, arms and legs – matched. They realized that human bodies have many features that can be described by using this word ‘symmetry.’
We then (depending upon the interests of the students) talked about the fact that most vertebrate/backboned animals have symmetrical bodies (even many creatures such as butterflies, crickets or lobsters have such a pattern in their body). We would comment that if you thought about it, you could imagine that most creatures have a midline, and if they could somehow flatten out their bodies and fold them along that midline, then the two halves of their bodies would match – just like our hands do. We wondered about why this might be. We then tried standing on just one foot and discovered how much harder it is to balance when we’re not standing with a symmetrical base. We would talk about this and sometimes conclude that bilateral symmetry (and other types of symmetry we’d discuss later) might provide living creatures with a little more stability as they tried to move about their world. (That there might be other reasons as well could also be acknowledged.)
Next the students learned an art technique for creating perfectly symmetrical paper cutouts – in this case in the shape of an amphora. ( Later, we would use this same method to make hearts, butterflies, trees, paper dolls, stand-up animals, and other cut paper projects.) The technique for this amphora project involves carefully folding a piece of paper in half and placing / matching the folded paper’s midline to the straight side of a pattern that shows half of the symmetrical object being produced – in this case, the amphora. The pattern is carefully traced with a pencil and then the student cuts along the resultant line. Next, they unfold the paper. A perfectly symmetrical object should result! As scaffolding for my first graders, I often made symmetrical templates (not halves) out of a distinctive color, labeled these as PATTERNS, and then instructed the children to match the pattern to the folded rectangular construction paper fold to fold before doing the tracing of the curving contour of the amphora. That made the task much more intuitive for some of them. I also cut a path through the base of the handle or handles for less advanced students. For more skilled youngsters, I taught them how to cut a hole right in the center of the handle area – a nice skill to learn for those who were ready. (STEAM aside for teachers: Can you envision how physically matching a piece of material to its template and cutting out objects to create symmetrical forms could help build students’ cognitive and motor memories of this process? Can your principals, school boards and student families understand this as well?. Do you see how this sort of activity can generate a vivid motor memory that could serve as a foundation for later conscious insights and verbal formulations that are very useful for science learning? Can you imagine how these kinesthetic activities could possibly make the idea of RNA and DNA transcription more richly evocative and meaningful when the youngsters learn about this in 6th grade life science, or when they encounter (on a larger scale) processes such as mitosis, cell division or budding eukaryotes?)
Here are sample amphoras that first grade students cut out and then decorated with their own original banded patterns. Please note that many students of this age are not very concerned with developing beautiful banded patterns that continue all across their amphora. I might try to encourage such children to continue the patterns a little further across the width of the object, but if that isn’t their plan, I certainly have learned to accept that.


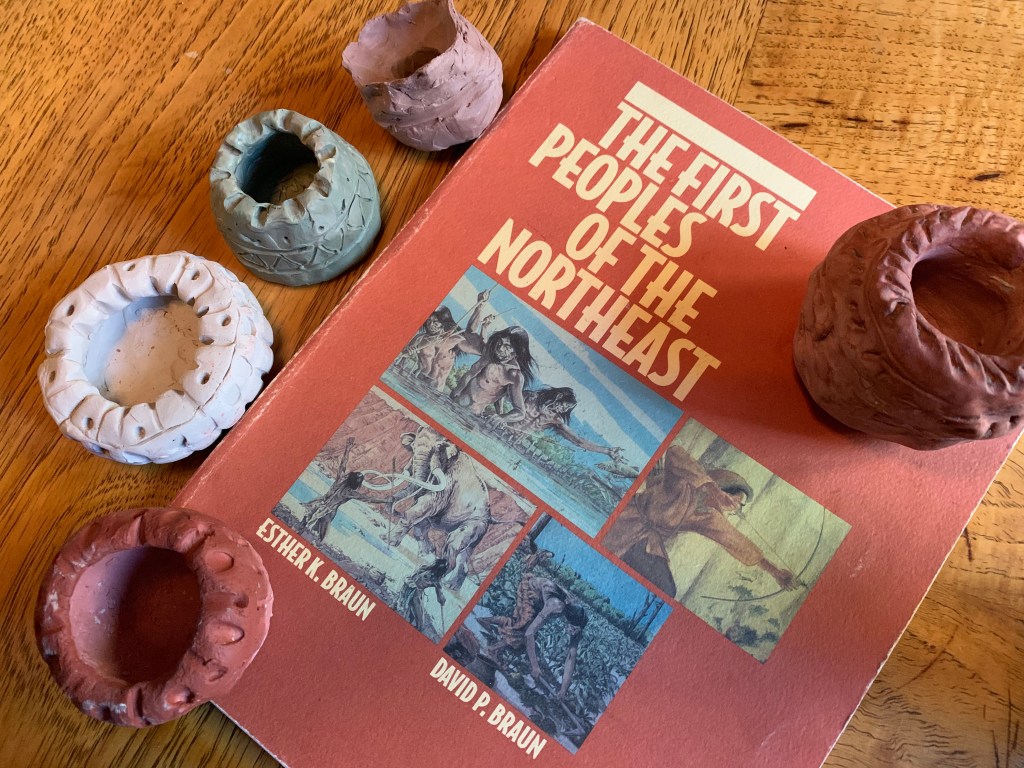
This assignment is often followed by a 3 D clay project in which the children construct little thumb pots (without handles) using air dried clay (ideally) or good quality modeling clay. We discuss radial symmetry and balance with regard to the form of these small vessels. The children add bands of beautiful, encircling, incised patterns (usually using simple straight elements such as x’s, and v’s or plain verticals, diagonals, and / or horizontals). I show them how they can also create interesting 3 D crenelated patterns around the clay lip by simply applying pressure, using their fingers directly, or a twig, a pencil, or clay tools. Some of the incised patterns they produce are inspired by illustrations of NE Woodland Native American clay cooking pots from a thousand years ago. The reference illustrations in the photo below are taken from an excellent book published by the Lincoln Historical Society in Massachusetts with support from the Massachusetts Archeological Society. Here’s the basic citation. Braun, Esther K. and David P. The First Peoples of the Northeast. Lincoln Center, Massachusetts: Lincoln Historical Society, 1994.


This is a project that was typically part of the first or second grade curriculum.
More experienced students would try a coiled method of pot constructin with more precise decorations. We would also discuss in greater depth the cone shaped base of these cooking pots – which is thought to be an design feature that provided for better heat conduction when the vessels were placed in or over the actual fire pit. There is a charming and detailed narrative (in addition to line drawings of the process for making these coiled pots) contained in chapter 11 of Howard Russell’s beautiful book Indian New England Before the Mayflower (Hanover, NH and London, England: University Press of New England, 1980, p. 106 – 110). I used to read this to the students in summer programs at a local nature center, and this evocative story added considerably to their understanding of how ceramic production was interwoven with daily life.